
Rosining Your Bow for the First Time: A Beginner's Guide
Applying rosin to your bow for the first time is a significant milestone for new string musicians. Before developing muscle memory, holding the bow and fingering the strings can feel awkward. However, rosining your bow is a step you can master with confidence.
Just like every other aspect of playing the violin, viola, cello, or bass, rosining the bow requires some technique. The type of rosin, the amount you apply, and how often you apply it all affect bowing and sound quality.
With time, you’ll develop an intuitive sense of how much rosin to use based on personal preference and desired sound. Until then, here are some essential tips for rosining your bow effectively.
1. Choose the Right Rosin for Your Instrument and Climate
Bow hairs are naturally smooth, and rosin adds the necessary friction for sound production. Made from the sticky resin of coniferous trees, rosin comes in different shades and densities.
- Darker rosins are heavier and stickier, making them better suited for larger string instruments like cellos and basses.
- Lighter rosins are less dense and tacky, ideal for violins and violas.
Climate also plays a role. Rosin responds to temperature and humidity changes, so musicians in warmer, humid areas might benefit from switching rosins seasonally.
Tip: Store your rosin in your instrument case with a humidity-regulating accessory to maintain its integrity.
2. Check If Your New Bow Is Pre-Rosined
When purchasing a new instrument and bow, ask if the bow has been pre-rosined. Fresh bow hair doesn’t hold rosin initially and requires a more thorough application.
- If your bow is pre-rosined, you’ll only need to pass it over the rosin three to four times before playing.
- If your bow is unrosined, you’ll need to apply rosin generously—40 to 50 strokes—to ensure an even coating.
Your instructor can demonstrate proper rosining technique, and with practice, you’ll refine your own method.
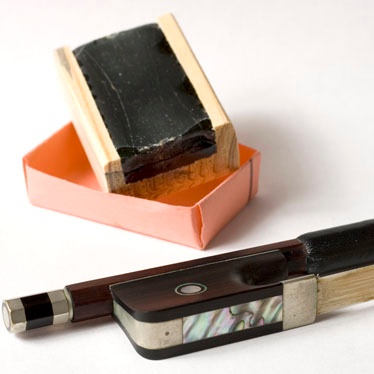
3. Prepare a New Rosin Cake Before Use
Brand-new rosin cakes have a smooth, glossy surface that makes initial application challenging. To improve adhesion:
- Use a plastic fork or serrated plastic knife to gently scratch the surface.
- Avoid pressing too hard—light scoring is sufficient to dull the surface without gouging the rosin.
Once prepared, the rosin will adhere more effectively to your bow.
4. Apply Rosin Properly
Important: Never touch the bow hair with your fingers, as natural oils can make it harder for rosin to stick.
To rosin your bow correctly:
- Tighten the bow hairs before application to prevent damage.
- Place the rosin cake at the base of the bow and gently stroke the bow hairs across the surface from bottom to top.
- Apply rosin evenly by moving slowly and consistently—rushing can generate heat, hardening the rosin.
- Rotate the rosin cake periodically to prevent grooves from forming, which ensures even distribution.
- Clean excess rosin dust from your instrument after playing using a soft cloth to protect the strings and body.
How often? Students typically reapply rosin every four to six playing hours, or about twice per week.
5. Finding the Right Amount of Rosin
How much rosin you apply impacts sound quality and playability. Here’s how to identify the right amount:
- No rosin – Produces a weak, hollow sound, requiring excessive pressure to produce any tone.
- Too little rosin – Sound is inconsistent, as the bow struggles to maintain proper friction on the strings.
- Just the right amount – The bow moves smoothly across the strings, creating a warm, resonant tone (typically four to five strokes per application).
- Too much rosin – Creates a visible dust cloud, makes the bow feel sticky, and results in a scratchy, harsh sound.
With experience, rosining your bow will become second nature. Until then, use these guidelines to refine your technique and achieve the best sound quality.